
This pattern of 6 warp yarns, or 3 pairs, called tanka ch’oro, is the most common beginner project in the Andes. It’s a starter piece for young girls in textile producing communities, and they weave dozens of these as a way to learn the basics. A narrow band like this enables the weaver to get accustomed to controlling warp tension with her body, passing the weft consistently, and appreciating the importance of the yarn quality needed for the handspun warp.

My stash of spindle-spun two-ply weaving yarns, wound in balls and stored together as an accumulated palette for backstrap weaving projects. Chak chak spindle in progress, empty plain spindle from Peru, and finished tanka ch’oro band in the lid (this is an old wicker picnic basket that my parents used when I was little.)
I knew that people started learning with this pattern, and I more or less started with it, just over 10 years ago, but I did not weave dozens of tanka ch’oro bands, just one or two. Only recently, having seen a live online demonstration of the weaving of this band, from warp-winding to finished piece, did I suddenly realize that I needed to weave a whole bunch more if I wanted to really learn what’s what.
Sonia, who demonstrated her method for making what she considers an easy baby weaving (she had to be convinced we were really interested in seeing such a fundamental, unexciting thing), had a number of tricks I wanted to try. First of all, she wound the heddle string (illawa) while the warp was still on the pegs, which I tried and hey that’s convenient! Then, she took the end in her hand and just started weaving, without a sword beater (kaulla), just using her fingers to tension the warp, open sheds, and beat.
Weaving the first few rows with my fingers. Handspun wool warp with 6 light and dark pattern warp yarns, and two red border yarns each side. Tensioned on my warping peg at the other end.
Sonia did at least one motif before attaching the band to her belt, and I wanted to attempt pickup patterning using just my hands as well. A note, these photos are from the fifth band - the first one may have not looked as skillful.

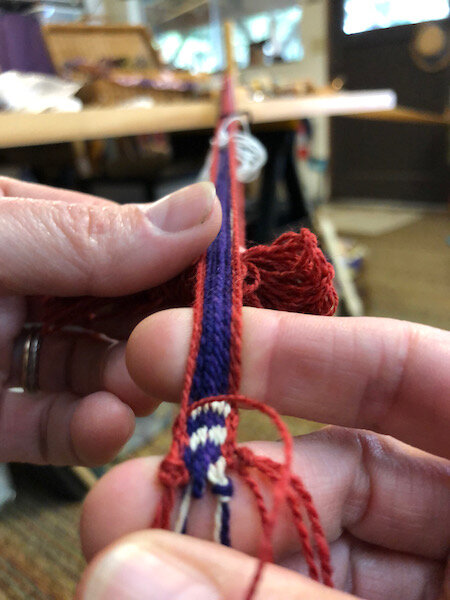
With the white shed open, I select the warps I want, from left to right. The next two light warps will be dropped, one by one, in order to pick up the dark ones.

Now the dark shed is open, and I’m selecting left to right. This is my habit, but Andean weavers work from either side, depending on the pattern and the circumstances.
Weaving a narrow band with a backstrap is a minimalist practice regardless, but there is something extra satisfying about weaving with only my yarn and my hands. After a couple of inches, I attached the band to my belt, and kept weaving without a sword beater.

One tanka section complete, all woven using hands only.
At some point during Sonia’s demo, Abby was trying to answer a question about “memorizing all those patterns” (for the more complex, large weavings,) what that means in the context of Andean weaving and how that differs from how those of us viewing might think and learn, and she finally said: “This is language, she’s writing ABC, ABC, over and over again.” The weavers begin with this vocabulary, this three-pair pattern that only uses one simple sequence, giving the fundamentals of what they need to build upon.
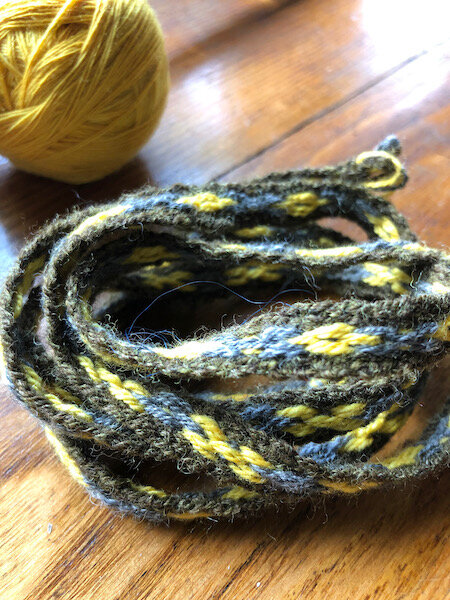
I think this was the second band in the current series. Yellow targhee, gray alpaca, heathered green wool blend. I’m learning about the subtle differences in my various handspun yarns with these bands.
The other main trick that Sonia showed us is the four-selvege finishing, which is used on many of the textiles in her region. When you get close to the end of the warp, the weaving is flipped, the shed loop moved behind the heddles, and you weave from the other end, in the same pattern. There’s no big mystery to that part, but it gets tricky as your unwoven warp region shrinks. Eventually you have to remove the illawa (heddles) and work the weft through with a darning needle. Sonia wrangled two darning needles, and as she slowly worked the terminal area into woven cloth, in pattern, this mysterious process that I’d known about but never seen done became suddenly accessible. I had to try it on my tanka ch’oro.

First band after the demo, my warp has been flipped, about 3 inches remains between woven sections. I can still work the illawa (heddles) and sonqopa (shed loop) at this point.
It is hard to convey how much fiddling, grunting, frustrated sighing and backtracking can go into the terminal area, even for a very small band like this. After six times, it’s a bit easier, but the last couple of rows still feel like brain surgery. I can’t fathom doing this on a larger piece…. but it’s exciting to know how it’s done, and to have just the tiniest glimpse into the skill involved with textiles I’ve been admiring for years.

Heddle string (illawa) is removed, the needle works as beater and shuttle to clear the shed and pull the weft through. A second needle can help with pickup.
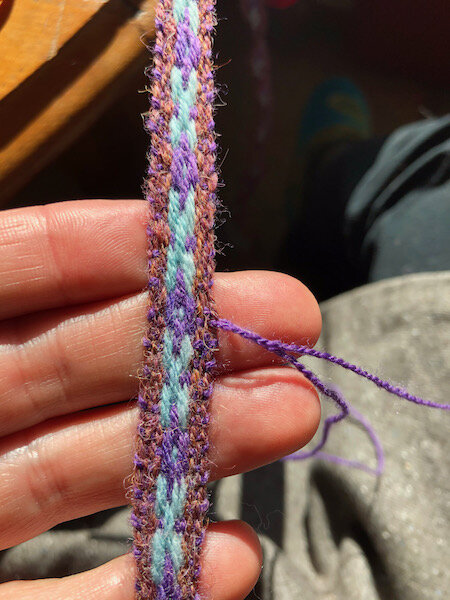
The terminal area is finished, and I was lucky -the pattern lines up! (This only happened on half of my bands so far)
Why repeat this one, simple thing that I seem to already ‘know” how to do? Because it’s how the whole of Andean weaving is learned, it’s an entry point of understanding, from the perspective of the people who practice this as part of their heritage, going back centuries. It’s a way of attempting to enter through the ground floor, not by zip-lining in on some artificially elevated level. Walking in, at a level with or below the people who know how to do this, letting their method guide my learning. More than anything, I see this as a way of listening.
I will continue to use charts to figure out patterns, and I was thinking that if weaving basic patterns is like learning alphabet and language, then charts may be like the wide-ruled elementary school paper with pre-traced letters, on which children practice writing. After a certain amount of practice with the chart, the pattern starts to make sense and I can carry on with just my weaving and the language I have learned in my head.
One thing I know for sure - when I have a small, handspun wool band in progress, I feel like I have something important, grounding, and real going on.


